Step 1. Create an "unoptimized" model
If this were a "real" problem, we'd have to
convert our morphometric data to a form that NEURON can use
(e.g. using NEURON's Import3D tool to import it into a CellBuilder).
Then we'd use the CellBuilder to specify the
discretization strategy and insert Ra, cm, and the pas mechanism (see the CellBuilder
tutorial).
For your convenience, I have already
- imported the data into a CellBuilder
- specified the d_lambda strategy for the "all" subset
(with d_lambda = 0.1 lambda100)
- inserted Ra, cm, and pas into the "all" subset,
leaving their default parameter values unchanged
(80 ohm cm, 1 uf/cm2, g_pas = 0.001 siemens/cm2).
e_pas was set to -70 mV, the "experimentally observed" resting potential.
- turned Continuous Create ON
and saved the results to rawmodel.ses
This link will get you code.zip, which contains
rawmodel.ses
plus other files that are used in this exercise.
Step 2. Set up a current clamp experiment on this model
Remember that the charging transient was elicited by applying a 1 nA current pulse that
started at 1 ms and lasted 0.5 ms, and the entire recording was 200 ms long.
We need to construct a "virtual experimental rig" that applies the same current
to the soma of our model.
So we start nrngui and use the NEURON Main Menu toolbar to load rawmodel.ses
Then we create
- a RunControl panel. Change Tstop to 200 ms and set v_init to -70 mV
(numeric field next to the Init button).
- a PointProcessManager. Configure this to be an IClamp. Leave it attached to soma(0.5),
but set del = 1 ms, dur = 0.5 ms, and amp = 1 nA.
- a Voltage axis graph
- a Current axis graph. Use this graph's "Plot what?" to add IClamp[0].i to its plotlist.
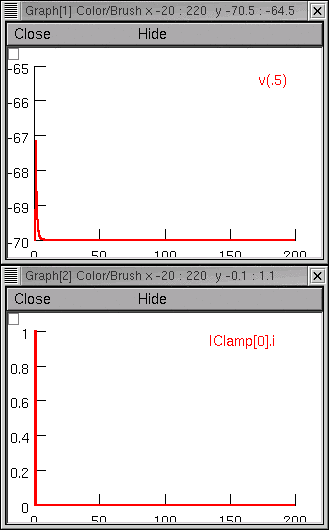
Now we run a simulation and find that somatic Vm is a far cry from the original experimental data.
Project management time!
Before going any further, we should use the Print & File Window Manager to save a
session file that contains the "virtual experimental rig" (the RunControl panel,
PointProcessManager, and graphs, but not the CellBuilder).
This can be called anything we like (I called it "iclamp_rig.ses").
To make it easy for us to recreate our current clamp experiment,
we next create a file called init_iclamprawmodel.hoc that contains these statements :
  load_file("nrngui.hoc")
  load_file("rawmodel.ses")
  load_file("iclamp_rig.ses")
Using NEURON to execute init_iclamprawmodel.hoc loads our unoptimized model,
and brings up our current clamp rig, ready to go.
What about input resistance?
Oops.
Almost forgot this.
We have to verify that RN of our model cell matches the experimentally measured value.
Let's take advantage of NEURON's Impedance class, which has an
input() method that computes the input impedance at a specified location.
Here's a bit of code that does the job :
  objref zz
  zz = new Impedance()

  func rn() { local rn
    init()  // make sure all changes to g, c, ri etc. have taken effect
    soma zz.loc(0.5)  // sets origin for impedance calculations to middle of soma
    zz.compute(0)  // DC input R
    soma { rn = zz.input(0.5) }  // rn is input R at middle of the soma
    return rn
  }
Just cut and paste this into a file called rn.hoc
Finally, let's add these lines to the end of init_iclamprawmodel.hoc :
  load_file("rn.hoc")

  print "DC input resistance of cell is ", rn(), "megohms"
  run()
Now when we use NEURON to execute init_iclamprawmodel.hoc ,
it automatically uses rn() to report RN of our model
and then runs a simulation that shows the transient response.
Here's what the revised init_iclamprawmodel.hoc tells us:
DC input resistance of cell is 5.6534218 megohms
Nowhere near the experimentally measured 153 megohms.
Notes:
- code.zip contains my iclamp_rig.ses and init_iclamprawmodel.hoc
- The principal difference between init_makedata.hoc and init_iclamprawmodel.hoc
is which model's ses file is loaded.
The former loads the model that has the "actual" biophysical properties of the cell
(which we're supposed to use the optimizer to discover).
The latter loads the model that has our wildly inaccurate initial guess at these properties.
Modular programming!!
Next we will bring up a MultipleRunFitter and configure it to do a "run fitness" optimization.
[ Outline |
Next ]
Copyright © 2004-2012 by N.T. Carnevale and M.L. Hines, All Rights
Reserved.